
5 Windows Shortcuts That Will Make You Scary Productive!
Happy spooky season! And if you’re reading this after Halloween has passed, fear not , because the rest of this blog is applicable any time of year!
There are almost an unlimited number of keyboard shortcuts to learn. Each program has its own set and trying to know them all would be a hopeless endeavor. So when preparing for this blog I thought I’d try to keep it to 5 intermediate shortcuts so that it isn’t too overwhelming. I’d even suggest only trying to learn 1 or 2 of them at first; if you try to remember all 5 you’ll probably forget them all.
I chose 5 intermediate navigation shortcuts for Windows. Some of these shortcuts I use potentially hundreds of times a day. While a couple of others are less frequent but time-saving when needed. If there are Mac equivalents I will note the shortcut, but the functionality might be slightly different.
1) Alt + Tab
(Command + Tab on Mac)
Alt + Tab is one of the most useful shortcuts for navigation, and maybe a contender for most useful of all, especially if you only have 1 monitor. Using Alt + Tab will bring up a little window showing your active programs sorted by most recently used.

It will start by selecting the most recent program you had running and every time you hit tab it’ll move one further away. When you release the alt key it will open whatever program you’ve selected. It’s great for quickly switching back and forth between windows if you’re working with one screen! You can also use your mouse to select the program if it’s further down the list. Just remember not to release the alt key before you click on the program. There are times where I can use this shortcut hundreds of times in one day.
1) Windows + Tab
(Control + Tab or F3 on Mac)
Windows + Tab is Alt + Tab’s older brother. When you hit this shortcut you’ll be shown every window that you have open in a larger window where you can click on the program you’d like to use. If you have multiple monitors it will show the windows on the monitor the program is present on. For those who use virtual desktops, this view will also show you your open desktops so you can switch to them or close them. The last feature in this view is the history view, when you scroll down it will show you past windows and programs that have run.
1) Windows + Arrow Keys
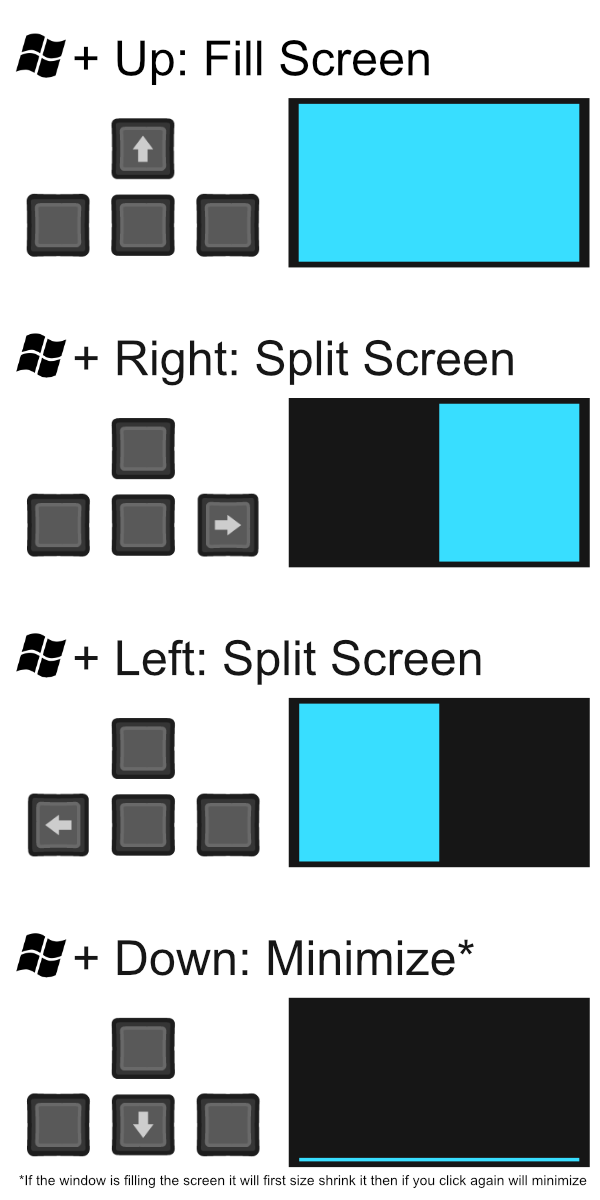
Most have probably used the Windows snapping feature by dragging a window to the side or the top of the monitor to split screen or full screen a program. Well instead of using your mouse you can use the Windows key + the arrow keys to trigger different movements! I decided I’d create a little guide photo for this in case you want to learn it and would like something to reference. To download the photo right click it and select “Save Image As…..” then name it whatever you would like and save it where you’d like to.
When you hit the Windows key + Up it will fill the screen with whatever program you are currently using.
When you hit Windows key + Right or Left it will activate split-screen for the program you are using. I didn’t put it in the guide because I wanted it to be simple but in addition to a split-screen with a left and a right quadrant, you can create a 4-way split. It’s unlikely that this would be useful for most, but to do it you hit {Windows + Right or Left} 2 times, then you can use the up, down, and side arrows to move it between the four areas.
Using the Windows Key + Down you can minimize windows quickly. If the program you are using is already set to fill the window it will first shrink it to it’s default size then with another push of the same keys it will minimize it fully.
1) Windows + D
The Windows key + D shortcut is your desktop shortcut. No matter how many windows you have open it’ll minimize them and show only your desktop. Now we aren’t telling you this so you can get away with social media while at work, but rather if you need to copy a document or something from your desktop this makes it much easier to do so. Once the programs have minimized, and you haven’t opened any other windows back up, you can hit the shortcut again and all your windows will go back to how they were.
1) Windows + L
(Command + Option + Q)
Our final shortcut is the Lock shortcut. Windows + L will lock your computer. This is a great shortcut to know if you work in an office setting or at home with kids. Even if you have no reason not to trust your co-workers, although workplace computer pranks aren’t particularly uncommon, locking your computer when you’re away from it is a good idea to protect your own privacy and the privacy of others who are communicating with you. And if you’ve got little monsters running around your office, locking your computer is almost a must to make sure they don’t, intentionally or not, cause problems.